How to replace the headlights on a Citroen Xsara
Recently my left headlight broke. I thought I'd change it quickly, but after half an hour of fiddling I decided to ask my dealer to do it for me, while I was looking. That was not a bad idea. It turned out to be not so straightforward after all, and you actually need tools (which you don't get when buying the car) to do this! This lead me to write a "small" article on how to replace the headlights of a Citroen Xsara. Enjoy.
[](r_citroen-xsara-break-14-hdi.jpg)** The Car** This is my Citroen Xsara break 1.4 HDi. No, that's not the picasso model, you've seen that right. I think car manufacturers need to stop naming a complete line of cars with just one name. Nobody knows what car you are driving, even if you tell them. Good examples are the Citroen Xsara and the Renault Megane. But that's not what this article is about.
Recently my left headlight broke. I thought I'd change it quickly, but after half an hour of fiddling I decided to ask my dealer to do it for me, while I was looking. That was not a bad idea. It turned out to be not so straightforward after all, and you actually need tools to do this! You will need a 10mm wrench and a screwdriver. If you have thick fingers, I'd recommend a pair of pliers as well.
I wrote the whole procedure down here, for other Xsara owners to read. It can save you a costly trip to the garage, or a trip without headlights in a very dark area. The left headlight is the hardest to replace, the right headlight can be done without tools (although still a bit hard to reach).
(Click on the images to zoom in)
 1. Check the manual
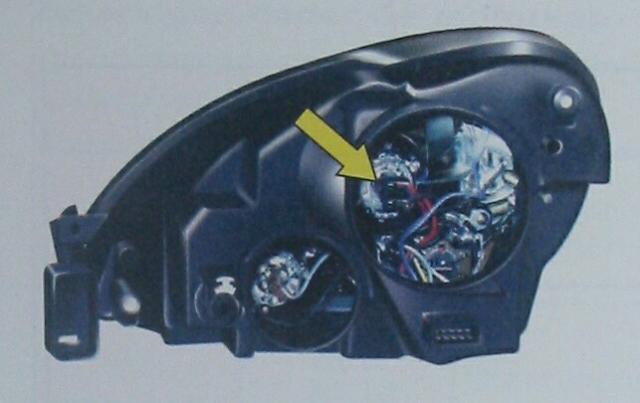
The first thing you need to do (if you care for a laugh) is check the manual on "changing lights". You will find a nice picture of the back of the headlight unit, with arrows pointing to the different lights. Surely this is to motivate you to do it yourself, but they kindly "forgot" to include the 9 missing steps to even get to the rear of the headlight unit.
1. Check the manual
The first thing you need to do (if you care for a laugh) is check the manual on "changing lights". You will find a nice picture of the back of the headlight unit, with arrows pointing to the different lights. Surely this is to motivate you to do it yourself, but they kindly "forgot" to include the 9 missing steps to even get to the rear of the headlight unit.
![]() 2. Remove left engine cover
Open up the hood (or stop reading here if you can't ;-). You will see some plastic engine covers. Yes, those are the same covers you need to remove on the right side to fill up your windshield wiper fluid. The first sign the designer must have been a complete and utter idiot.
2. Remove left engine cover
Open up the hood (or stop reading here if you can't ;-). You will see some plastic engine covers. Yes, those are the same covers you need to remove on the right side to fill up your windshield wiper fluid. The first sign the designer must have been a complete and utter idiot.
For the left headlight, remove the left engine cover (that's the right one if you are facing the front bumper ;-). Turn the little knobs 90 degrees counter clockwise and carefully lift up the plastic. The knobs are very flimsy, be careful not to break them.
 3. Remove air intake tube
The air intake tube is connected to a plastic box behind the headlight, with a bajonet lock. Turn the top of the tube slightly towards you, and then pull it out of the plastic box.
3. Remove air intake tube
The air intake tube is connected to a plastic box behind the headlight, with a bajonet lock. Turn the top of the tube slightly towards you, and then pull it out of the plastic box.
![]() 4. Remove air intake box nut
Below where the air intake tube was, you will find a 10mm nut hodling the bottom of the air intake box. Use a 10mm wrench to undo it. Be careful not to drop it into the engine compartment.
4. Remove air intake box nut
Below where the air intake tube was, you will find a 10mm nut hodling the bottom of the air intake box. Use a 10mm wrench to undo it. Be careful not to drop it into the engine compartment.

 5. Remove air intake box peg
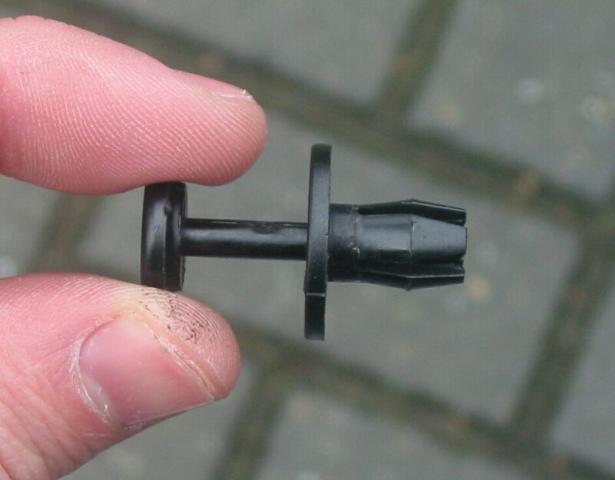
The top of the air intake box is held by a plastic peg. To pull the center pin out, you'll need to lift the pin with a screwdriver (look carefully at the picture). It should not take much force to take it out, please be carefull with this piece of plastic. I think Citroen will charge a pretty unfair amount of money to replace it should you've broken or lost it.
5. Remove air intake box peg
The top of the air intake box is held by a plastic peg. To pull the center pin out, you'll need to lift the pin with a screwdriver (look carefully at the picture). It should not take much force to take it out, please be carefull with this piece of plastic. I think Citroen will charge a pretty unfair amount of money to replace it should you've broken or lost it.
![]() 6. Remove ABS plug cover
Allways wanted to know what that aluminum box is with those steel lines comming out the top? Well that's your anti-blocking system unit, and you're about to disconnect it. First, you need to remove the cover which protects the plug from moisture. You better change your headlights while it is not raining, because chances are that your ABS will stop working if you get the connector to corrode.
6. Remove ABS plug cover
Allways wanted to know what that aluminum box is with those steel lines comming out the top? Well that's your anti-blocking system unit, and you're about to disconnect it. First, you need to remove the cover which protects the plug from moisture. You better change your headlights while it is not raining, because chances are that your ABS will stop working if you get the connector to corrode.
 7. Unlock and remove ABS plug
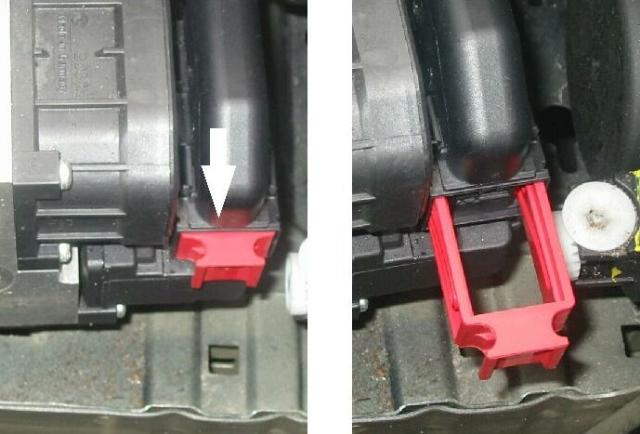
Pull out the red handle. The ABS connector plug should almost immediately loosen, and removing the connector should take absolutely no force. If it sticks, you probably didn't pull out the red handle enough. Carefully look at the picture.
7. Unlock and remove ABS plug
Pull out the red handle. The ABS connector plug should almost immediately loosen, and removing the connector should take absolutely no force. If it sticks, you probably didn't pull out the red handle enough. Carefully look at the picture.
![]() 8. Remove rear headlight cover
The lamp cover is a simple plastic lid. Just pull it away from the headlight unit.
8. Remove rear headlight cover
The lamp cover is a simple plastic lid. Just pull it away from the headlight unit.
.
.
.
![]() 9. Unplug headlight
Remove the grey and brown wired plug from the rear of the lamp.
.
9. Unplug headlight
Remove the grey and brown wired plug from the rear of the lamp.
.
.
 10. Remove lamp clip
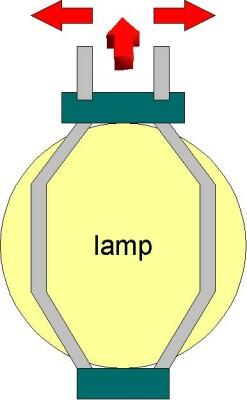
With a flashlight, you can see that the lamp is held in place by a clip. This clip has two handles at the top of the lamp. Push them towards the headlight unit, and then outward. The lamp can now be taken out. Please take note on it's orientation when taking it out, there is only one way of putting it back in without damaging your headlight unit or blinding oncomming traffic.
10. Remove lamp clip
With a flashlight, you can see that the lamp is held in place by a clip. This clip has two handles at the top of the lamp. Push them towards the headlight unit, and then outward. The lamp can now be taken out. Please take note on it's orientation when taking it out, there is only one way of putting it back in without damaging your headlight unit or blinding oncomming traffic.
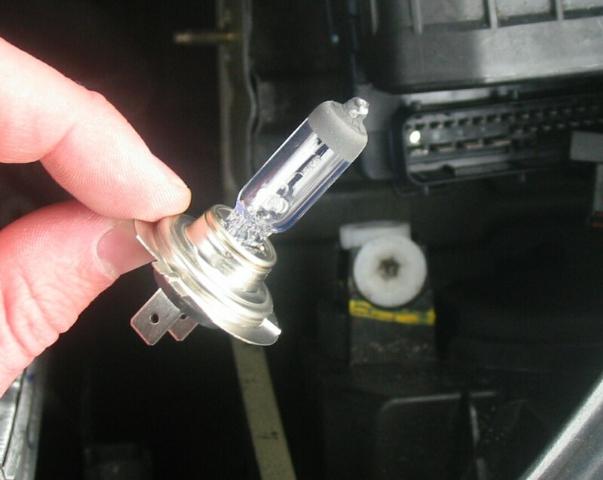 11. Replace lamp
Replace the lamp with a H7 type lamp, again note the orientation of the lamp. Don't touch the glass with your fingers. Touching the glass will leave grease on the glass. When the lamp heats up, it will become hotter than normal, shortening it's lifetime. Even worse: the grease will vaporize and leave a non-removable milky deposit on your reflectors. Reflectors are very expensive to replace. The dealer will charge you for a complete headlight unit.
11. Replace lamp
Replace the lamp with a H7 type lamp, again note the orientation of the lamp. Don't touch the glass with your fingers. Touching the glass will leave grease on the glass. When the lamp heats up, it will become hotter than normal, shortening it's lifetime. Even worse: the grease will vaporize and leave a non-removable milky deposit on your reflectors. Reflectors are very expensive to replace. The dealer will charge you for a complete headlight unit.
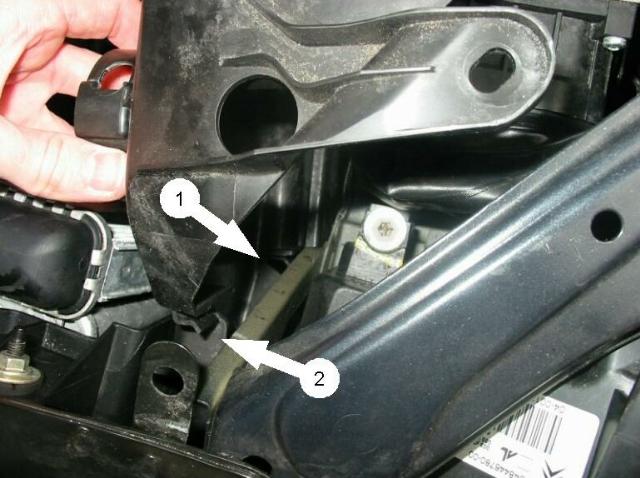 12. Put it all back together
Connect the lamp and make sure it is working. After that, re-install all parts in revers order. Make sure that when you re-install the air intake box, the clips (pointed out by arrows 1 and 2 in the picture) are around the steel rimm. If the air intake box is not correctly placed, the plastic pin will not go through the misaligned holes, and the bottom slot will not align with the thread on which the 10mm nut goes.
12. Put it all back together
Connect the lamp and make sure it is working. After that, re-install all parts in revers order. Make sure that when you re-install the air intake box, the clips (pointed out by arrows 1 and 2 in the picture) are around the steel rimm. If the air intake box is not correctly placed, the plastic pin will not go through the misaligned holes, and the bottom slot will not align with the thread on which the 10mm nut goes.
I hope this will help other owners of Citroen Xsara's in replacing their own headlights. If you do not feel confident of something when replacing your headlights, please contact your local dealer. Needless to say, messing aroung with your brake system should be done with care and professionalism.
Take care!