Wiimote Whiteboard
 For people wanting to have an interactive whiteboard but don't have the money, Johnny Chung Lee has found the solution. Using a Wiimote, he can track an infrared lightsource (like an LED) and use that to control the mousecursor. I tried some software on the Mac and the PC, and I actually got both to work without too much trouble.
The infra-red pen Please note that you need some kind of Infra-Red emitting device. In my first tests to see if the software works, I used a TV remote. This is a bit clunky, so next on my list is to build a simple infra-red pen this weekend.
I noticed a lot of people building infra-red pens by directly connecting an LED to a battery, which will possibly ruin your LED very quickly because there's too much current running through it. An LED is a diode, and it needs to be limited in current. The only right way to do it is follow Johnny's schematic.
Whiteboard app on the Mac: I was amazed about how well this worked. I was expecting a lot of experimental stuff, but instead, this is all you have to do:
1. [
](afbeelding-21.png)Download WiimoteWhiteboard for the Mac by Uwe Schmidt. 2. Enable bluetooth on your mac. 3. Start the WiimoteWhiteboard.app 4. On the Wiimote, press buttons 1 and 2 simultaniously to put it in "detectable" mode. If the Wiimote was already on, you may need to press the red button in the battery compartment. 5. After pairing is complete, press the "calibrate" button and follow the instructions.
I did these steps on an intel Mac mini and it worked beautifully. You can pair up to 2 Wiimotes to increase reliability.
Whiteboard app on the PC: This is slightly more work, but does not include steps which are strange to regular Windows users:
1. Download and install the [.Net framework version 3.5](http://www.microsoft.com/downloads/details.aspx?FamilyId=333325FD-AE52-4E35-B531-508D977D32A6&displaylang=en)
2. Download Boon Jin's [Smoothboard](http://www.boonjin.com/wp/2008/08/14/wiimote-smoothboard-045-beta) for Windows.
3. [
](clipboard02.png)Install the .Net framework, and unpack the smoothboard zipfile in a convenient location. It has no setup.exe (thank god)
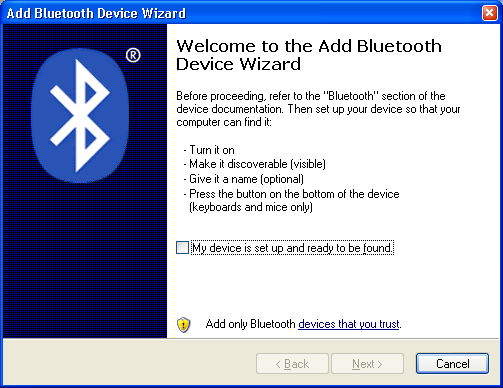
4. In the system tray on your Windows, right-click the bluetooth icon, and choose "Add a Bluetooth Device"
5. Click the "My device is set up and ready to be connected" checkbox.
6.  Press the red button of the Wiimote (in the battery compartement) to unpair it from anything else and get into "detecable" mode.
7. Click the "Next" button in the Wizzard
8. Select the "Nintendo RVL-CNT-01" device and click "Next"
9.
Press the red button of the Wiimote (in the battery compartement) to unpair it from anything else and get into "detecable" mode.
7. Click the "Next" button in the Wizzard
8. Select the "Nintendo RVL-CNT-01" device and click "Next"
9.  Select the "Don't use a passkey" radio button and DON'T press "Next".
10. Press the little red button on the Wiimote again, so that all blue lights start flashing, and then press "Next" on the wizard.
11. In the tray, you should now see popups saying "Found new hardware" and something like "New HID device". They will dissapear after a while. If the popups did not show, start the whole process again from step 4.
12. Press "Finish" in the Wizard, notice that the Wiimote keeps flashing all the lights.
13. Start Smoothboard. The Wiimote should stop flashing, and you can click on the "Calibrate" button to start the fun.
Select the "Don't use a passkey" radio button and DON'T press "Next".
10. Press the little red button on the Wiimote again, so that all blue lights start flashing, and then press "Next" on the wizard.
11. In the tray, you should now see popups saying "Found new hardware" and something like "New HID device". They will dissapear after a while. If the popups did not show, start the whole process again from step 4.
12. Press "Finish" in the Wizard, notice that the Wiimote keeps flashing all the lights.
13. Start Smoothboard. The Wiimote should stop flashing, and you can click on the "Calibrate" button to start the fun.

I've tested the Windows setup on a Dell 530 laptop with the built-in bluetooth device, and it works fine, although I did have to reboot once because the bluetooth stack got confused and refused to detect my Wiimote. Smoothboard also allows you to pair 2 Wiimotes to improve reliability. It also has many features which are tailored to controling Powerpoint and other software, but I haven't tried that yet.