Distributed jMeter through VPN and SSL
 This week I created a jMeter test setup for distributed testing. I thought it would be straight forward but I ran into some interesting things you might want to know if you are considering distributed testing using jMeter.
In my case, I had to test an application which was inside our corporate network, while working from home through a VPN and a firewall. Normally that is no problem, but jMeter has this funny construction where the slave (jMeter server) wants to connect back to the master (jMeter gui). It took some fiddling with iptables, the jMeter configuration and ssh tunneling to get it to work. Here's my setup:
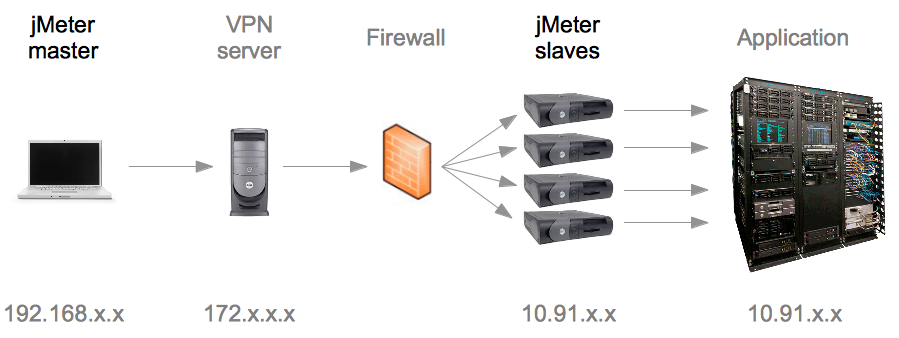
Getting this all to behave nicely wasn't trivial. All the information can be found, but it took me quite some time to piece it all together. If your setup looks like the one above, or if your setup involves having your jMeter master machine on a different subnet and/or behind a firewall, here's what you need to do.
Step 1: Configuring the slaves In most jMeter setups, the slaves are Linux machines (any flavor will do, mine are redhat). Create a "jmeter" user on each of the machines so that you don't have to run the jMeter process as a root user.
  1. [Download jmeter](http://jmeter.apache.org/download_jmeter.cgi) as a zip file and unzip it on each of the jMeter slave machines. At the time of this writing I am using jMeter 2.6. Make sure that the files in the bin directory are executable with


chmod +x *.sh jmeter jmeter-server


  2. On the first machine, edit the jmeter.properties file in the /bin folder of the unpacked jMeter installation and uncomment the line containing the server.rmi.localport setting. I changed mine to read:


server.rmi.localport=50000


  3. Save the jmeter.properties file and copy it over to all the other machines (in the correct location).
  4. As "root" user, edit the iptables configuration in /etc/sysconfig/iptables and add the following lines, just above the first "REJECT" line (the order is important here):


# Start jmeter ports
-A RH-Firewall-1-INPUT -p udp -m udp --dport 1099 -j ACCEPT
-A RH-Firewall-1-INPUT -p tcp -m tcp --dport 1099 -j ACCEPT
-A RH-Firewall-1-INPUT -p udp -m udp --dport 50000 -j ACCEPT
-A RH-Firewall-1-INPUT -p tcp -m tcp --dport 50000 -j ACCEPT
# End jmeter ports


  5. Save the file and while still being root, restart iptables with


service iptables restart
This covers the work you need to do on the slaves. To test your setup, start the "jmeter-server" application on one of the slaves. Note the address and port the server reports listening to:
Created remote object: UnicastServerRef [liveRef:
[endpoint:[<span style="color:#993300;">10.91.10.11:50000</span>](local),
objID:[-24679ca9:13581440206:-7fff, -1472515273052223306]]]
From another slave, you can see if the iptables configuration works by telnetting to this slave on port 50000. You'll get connected to the jmeter-server process. Use Ctrl-] to exit telnet (there is nothing useful you could type here). If you get a "Connection refused", your iptables configuration is not working. Check your steps again.
For now, stop any running jMeter processes on the slaves.
Step 2: Configuring the master The master is the system where your jMeter GUI will be running, and it is the system that tells the slaves what to do, and where to deliver their results. In order for the master to do that, it needs to be reachable by the slaves. In the network picture above you see a pesky firewall and a VPN server with mis-matching addresses. In order to make this work we're going to tell the master to listen at a fixed port for the slaves, and then do reverse port forwarding to the slaves so they can deliver content to a local port. Here's how:
  1. Take the same zipfile you used for the slaves. and unpack it on your master machine. In my case, this is a Macbook, running OSX 10.7.2
  2. Edit the jmeter.properties file in the bin folder and list the ip addresses of the jMeter slaves in the remote_hosts property (remove the 127.0.0.1 address) so that it looks like:


remote_hosts=10.91.10.10,10.91.10.11,10.91.10.12,10.91.10.13
Then look for the client.rmi.localport line and change that into:
client.rmi.localport=51000
This is all the configuration you need to do on the master. The trick is in starting it all up, read on.
Step 3: Starting your tests Now that your infrastructure is in place, let's put it to the test. First, from your jMeter master machine, connect to each of the machines using SSH, and setup a reverse tunnel to port 51000 on your master, like so:
ssh -R 51000:localhost:51000 jmeter@10.91.10.11
Keep each of these sessions open, as the jMeter slave needs to be able to deliver it's test results to your jMeter master. On your master machine, open a command prompt and type the following:
export JVM_ARGS="-Djava.rmi.server.hostname=localhost"
By doing this, jMeter will tell the slaves to connect to "localhost:51000" for delivering their results. This of course ends up being tunneled back to your jMeter master machine.
Then, on the master start jmeter.sh, load up your test script and use the "Run" Menu to run the script on one slave, or all slaves together. Remember that the master pushes your test script to each slave and tells it to run it. So if you have a script with a thread group running 10 threads, each slave will do 10 threads, resulting in 40 threads hitting your application.
Tips and Tricks During this whole adventure I collected a few handy tips:
  * Document the whole setup, cookbook style, and put that document in an easy to find spot. There will be a time you have to pass this on to a colleague, and it will help a great deal if he can pick up your document and hit the ground running.
  * Put as much of the command line stuff you see above in scripts. In my setup, I have a "connect-slave.sh" script which contains the reverse tunnel trick, a "start-master.sh" which starts the jMeter master with the correct JVM arguments, and a "start-slave.sh" script which starts the slave with a bit more memory. Each slave has 2GB of heap, because I added the following line to the script:


export JVM_ARGS="-Xmx2028m"


  * As much as you need to pay attention to the performance of your application, also make sure that your test script is lean and mean. Some listeners are very expensive to use. The "View Results Tree" and "View Results in Table" are very memory intensive. Great for debugging a single thread, you'll quickly run out of memory for 100 Threads or longer tests. Once you've got your scripts working, disable as much of the listeners as possible.
  * jMeter debugging is fidgety. When debugging your script, always do 1 thread and 1 iteration on 1 server. Once that works, you can scale up (don't forget to disable the "View Results Tree" listeners, see above).
  * jMeter quickly runs out of memory. Increase the default heap sizes of the master and the slaves by using the [-Xmx JVM option](http://docs.oracle.com/javase/1.4.2/docs/tooldocs/windows/java.html).
Happy Testing!