Replace Evernote with Spidernote
In the past I have used Evernote extensively, it really helped me in my research for this blog and keeping track of meeting notes, todo lists and even making pictures of whiteboards at work searchable. As a product, there is no note taking app that can beat Evernote. But there is a little problem that has become a deal breaker for me, and that is basically the NSA and the way Americans, and particularly the American government seems to think about people's privacy and online security.
Evernote is an American company, which sadly has to comply with whatever ridiculous request by the U.S. government to turn over data of innocent people all over the world (yes, even outside the U.S. border, I know, it’s amazing). This, combined with the fact that Evernote clearly can not use zero-knowledge encryption because of the services it provides, makes that all the data you and I put into Evernote are at NSA’s fingertips at all times. If you find that as scary as I do, and you have a Mac, there is a way to solve this.
If you use Evernote to sync notes between multiple Macs, you have to solve the syncing problem first. Ofcourse Dropbox is a no-go, because that is an American company storing unencrypted data too. I’m using SpiderOak since 2011, and it is much better than Dropbox in many ways. Check it out.
If you’re using Evernote on your iPhone I do not have a solution for you yet. But as for me, that is not a big deal, I thought the iPhone is not the ideal note taking platform anyway as this old man is not very fast on the touch keyboard.
 With all that out of the way, let’s migrate away from Evernote and replace it with a smart script and some synced Spideroak folders. I like to call it ”SpiderNote”.
1. Create a folder structure Inside your Spideroak shared folder or Hive, create a ”Spidernote” folder, and in that folder, create a ”notes” folder.
2: Export all Evernote Notes Start up your trusty Evernote client and select all your notes. From the ”File” menu, select ”Export Notes…” and store them in a folder called ”Evernote”, inside the ”notes” folder you just created. You should now have a folder called Spidernote/notes/Evernote somewhere inside your Spideroak folder, or somewhere locally on your Mac.
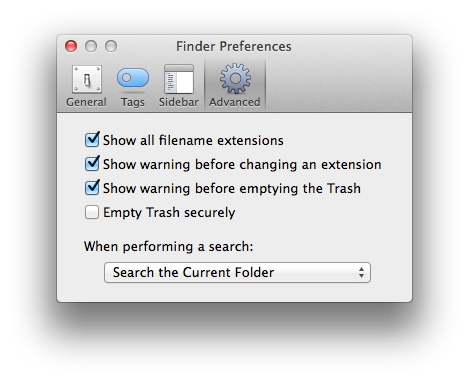
3: Getting Spotlight and Finder to work for you Open the Finder and press Cmd-, or select ”Preferences…” On the ”Advanced” tab, under ”When performing a Search” select ”Search the current Folder”. After you do this, you will find that when you open the notes folder in Finder, you can type some text and your old Evernote notes will popup. Look ma, no hands! And no Evernote!
4: Create a new template note OSX comes with a decent richtext editor, named ”TextEdit” which we are going to use for our note taking.Open TextEdit and save an empty file inside the notes folder which is called ”empty.rtf”. This will be your note template, the start of every new note. Remember you can set preferences that are stored with this file, like the default font and colors and tabs if you like.
5: Script to create a new note Create a file called ”newnote.command” in the Spidernote folder and copy/paste the following contents into it:
[sourcecode language="bash"]
#!/bin/bash
date=date +%Y%m%d-%H%M%S
BASEDIR=$(dirname $0)
cd $BASEDIR
notesdirectory="notes/${date}"
clear echo "Note will be stored in ${BASEDIR}/${notesdirectory}." echo "Type title/filename for note (without extension):" read filename
if [[ X"" = X"$filename" ]]; then filename="note.rtf"; fi
mkdir "${notesdirectory}" cp notes/empty.rtf "${notesdirectory}/${filename}.rtf" rm -f lastnote.rtf ln -s "${notesdirectory}/${filename}.rtf" latestnote.rtf open -a TextEdit "${notesdirectory}/${filename}.rtf" [/sourcecode]
You should now have a folder structure which looks something like this:
6: Add Spidernote to your Dock Drag the Spidernote folder next to your Trashcan in the doc (not IN your Trashcan, of course). Change the settings to have it’s icon show as a folder, and it’s context as a list. All set!
7: Create your first note From the Dock, click on the Spidernote folder and click on ”newnote.command”. A Terminal window will pop up, asking you for the (optional) title of your note (this will be the filename of the *.rtf file, so that it is easier to scan your search results later). After you press ”enter”, TextEdit will come up and you can type away.
When you are done and close the editor, you can easily find your note by searching, or by the ”latest note” link which the script creates for you in the Spidernote folder, so that you always can return to what you were doing when you accidentally close that note.
That’s it for now. I know it does not OCR scan your images, and it is really a poor-man’s Evernote, but these days your private has become a valuable asset to scrupules people and it has to be protected.
I know that there are a lot of note taking apps out there but frankly none of them work for me. If you have any tips on how to solve the OCR and tagging/organizing stuff please let me know.
Oh and don't forget to deactivate your Evernote account and remove all its data. After all, that's what started all this sad stuff.


